
Executing Drupal migrations from the user interface with Migrate Tools
In previous posts we introduced the concept of defining migrations as configuration entities. This type of migrations can be executed from a user interface provided by the Migrate Tools module. In today’s article, we will present the workflow to import configuration entities and execute migrations from the user interface. Let’s get started.
Important: User interfaces tend to change. In fact, Migrate Tools recently launched a redesign of the user interface. Screenshots and referenced on-screen text might change over time. Some exposed settings might work, but give no feedback indicating a successful outcome. Some forms might only work with specific versions of modules. The goal is to demonstrate what is possible and what are the limitations of doing so. In general, executing migrations from the command line offers a better experience.
Getting the example code
You can get the full code example for today’s example at https://github.com/dinarcon/ud_migrations The module to use is `UD configuration group migration (JSON source)` whose machine name is `ud_migrations_config_group_json_source`. It comes with three migrations: `udm_config_group_json_source_paragraph`, `udm_config_group_json_source_image`, and `udm_config_group_json_source_node`. Additionally, the demo module provides the `udm_config_group_json_source` group.
You could install the module as we have done with every other example in the series. Instructions can be found in this article. When the module is installed, you could execute the migrations using Drush commands as explained in this article. But, we are going to use the user interface provided by Migrate Plus instead.
Importing configuration entities from the user interface
The first step is getting the configuration entities into Drupal’s active configuration. One way to do this is by using the “Single item” import from the “Configuration synchronization” interface. It can be found at `/admin/config/development/configuration/single/import`. Four configuration items will be imported in the following order:
- The `udm_config_group_json_source` using “Migration Group” as the configuration type.
- The `udm_config_group_json_source_image` using “Migration” as the configuration type.
- The `udm_config_group_json_source_paragraph` using “Migration” as the configuration type.
- The `udm_config_group_json_source_node` using “Migration” as the configuration type.
When importing configuration this way, you need to select the proper “Configuration type” from the dropdown. Otherwise, the system will make its best effort to produce a valid configuration entity from the YAML code you paste in the box. This can happen without a visual indication that you imported the wrong configuration type which can lead to hard to debug errors.
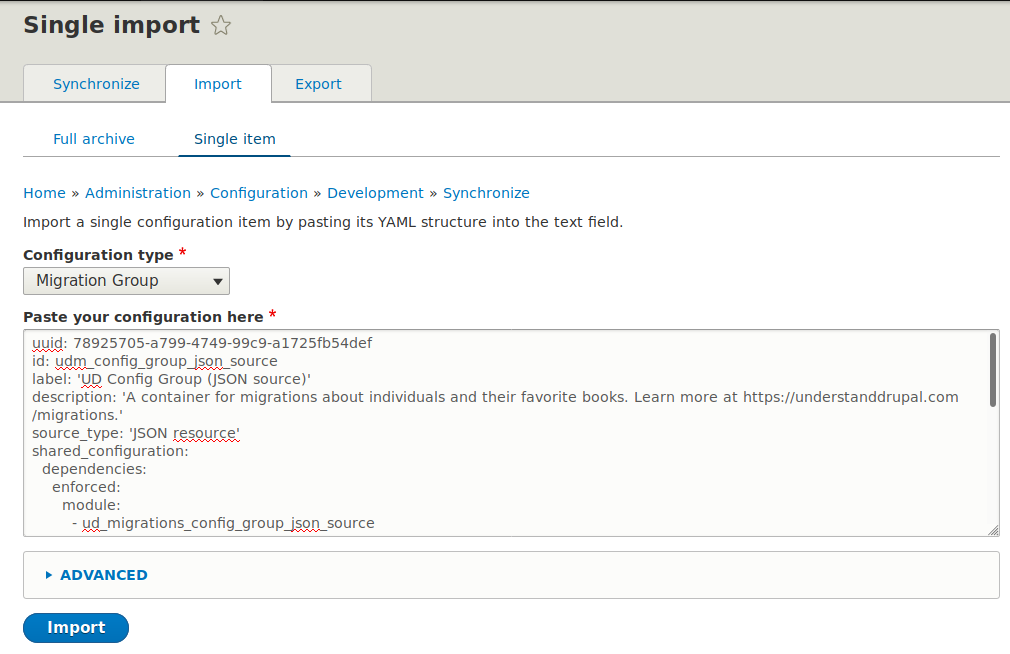
Note: If you do not see the “Migration” and “Migration group” configuration types, you need to enable the Migrate Plus module.
Another thing to pay close attention is changes in formatting when pasting code from a different source. Be it GitHub, your IDE, or an online tutorial, verify that your YAML syntax is valid and whitespaces are preserved. A single extraneous whitespace can break the whole migration. For invalid syntax, the best case scenario is the system rejecting the YAML definition. Otherwise, you might encounter hard to debug errors.
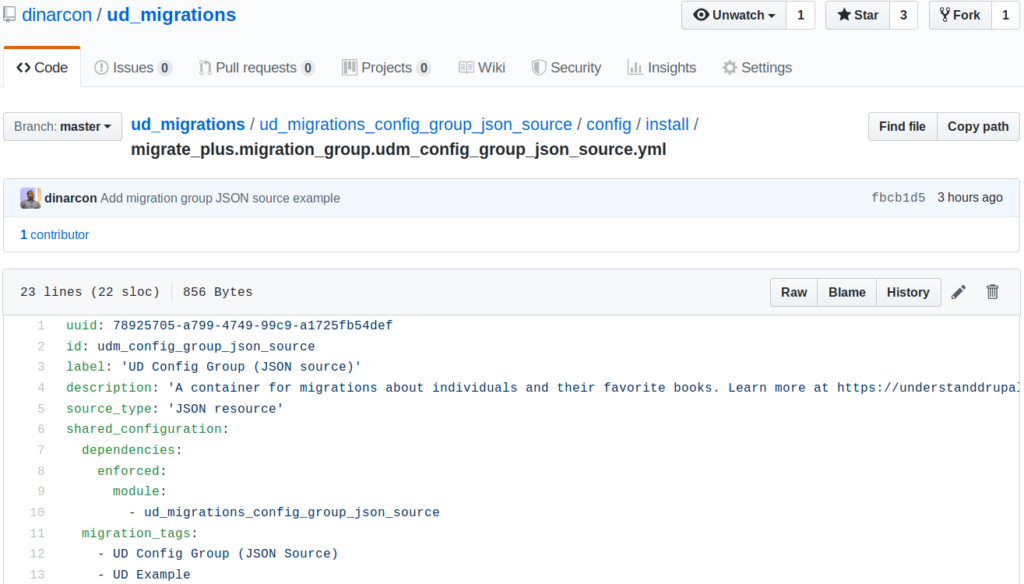
In today’s example, we are going to copy the YAML definitions from GitHub. You can find the source files to copy here. When viewing a file, it is recommended to click the “Raw” button to get the content of the file in plain text. Then, copy and paste the whole file in the designated box of the “Single item” import interface. Make sure to import the four configuration entities in the order listed above using the proper type.
To verify that this worked, you can use the “Single item” export interface located at `/admin/config/development/configuration/single/export`. Select the “Configuration type” and the “Configuration name” for each element that was imported. You might see some extra keys in the export. As long as the ones you manually imported are properly set, you should be good to continue.
Note that we included `uuid` keys in all the example migrations. As explained in this article, that is not required. Drupal would automatically create a `uuid` when the configuration is imported. But defining one simplifies the update process. If you needed to update any of those configurations, you can directly visit the “Single item” import interface and paste the new configuration. Otherwise, you would have to export it first, copy the `uuid` value, and add it to the code to import.
Executing configuration entities from the user interface
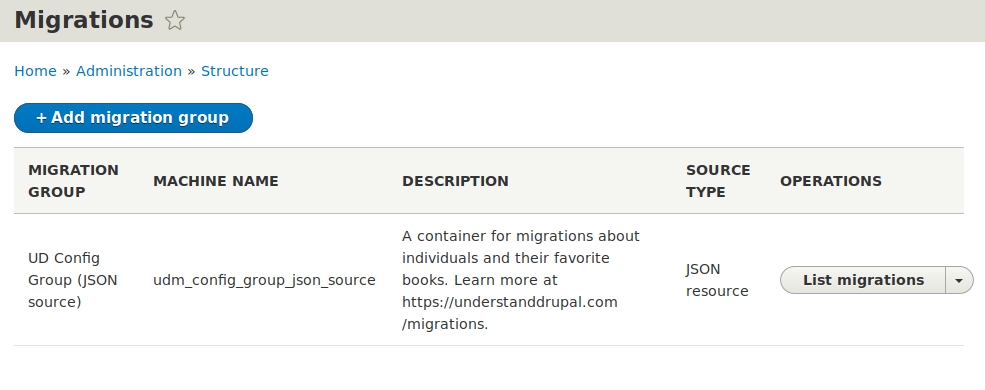
With the migration related configuration entities in Drupal’s active configuration, you should be able to execute them from the user interface provided by Migrate Tools. It is available in “Manage > Structure > Migration” at `/admin/structure/migrate`. You should see the `UD Config Group (JSON source)` that was imported in the previous step.
Note: If you do not see the “Migration” link in “Manage > Structure” interface, you need to enable the Migrate Tools module.
This user interface will list all the migration groups in the system. From there, you can get to the individual migrations. You can even inspect the migration definition from this interface. It is important to note that only migrations defined as configuration entities will appear in this interface. Migrations defined as code will not be listed.
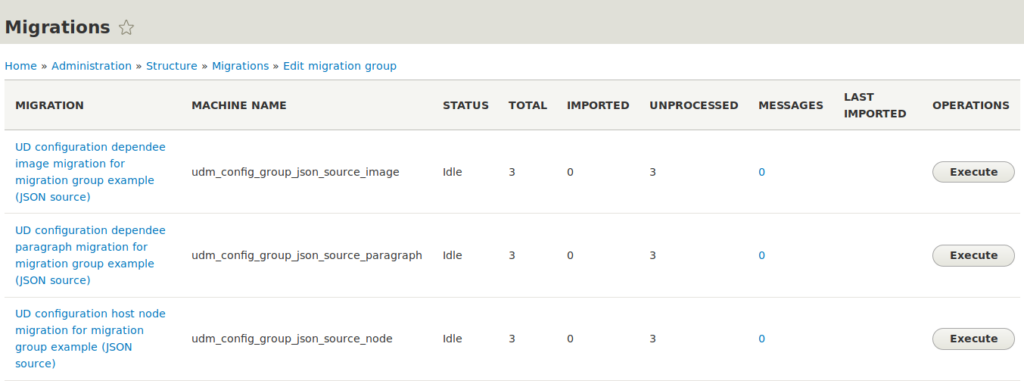
For the `udm_config_group_json_source` group, click the “List migrations” button to display all the migrations in the group. Next, click the “Execute” button on the `udm_config_group_json_source_image` migration. Then, make sure “Import” is selected as the operation and click the “Execute” button. Drupal will perform the import operation for the image migration. A success status message will appear if things work as expected. You can also verify that images where imported by visiting the files listing page at `/admin/content/files`.
Repeat the same process for the `udm_config_group_json_source_paragraph` and `udm_config_group_json_source_node`migrations. The final result will be similar to the one from the JSON source example. For import operations, the system will check for migration dependencies and execute them advance if defined. That means that in this example, you could run the import operation directly on the node migration. Drupal will automatically execute the images and paragraphs migrations. Note that migration dependencies are only executed automatically for import operations. Dependent migrations will not be rolled back automatically if the main migration is rolled back individually.
This example includes a paragraph migrations. As explained in this article, if you rollback the node migration, any paragraph associated with the nodes will be deleted. The Migrate API will not be aware of this. To fix the issue and recover the paragraphs, you need to rollback the paragraph migration as well. Then you re-import the paragraph and node migrations again. Doing this from the user interface involves more manual steps compared to running a single Drush command in the terminal.
Limitations of the user interface
Although you can import and execute migrations from the user interface, this workflow comes with many limitations.The following is a list of some of the things that you should consider:
- Updating configuration in production environments is not recommended. This can be enforced using the Configuration Read-only mode module.
- If the imported configuration entity did not contain a `uuid`, you need to export that configuration to get the auto generated value. This should be used in subsequent configuration import operations if updates to the YAML definition files are needed. Otherwise, you will get an error like “An entity with this machine name already exists but the import did not specify a UUID.”
- The following operations to not provide any user interface feedback if they succeeded: “Rollback”, “Stop”, and “Reset”. See this issue for more context.
- As of this writing, most operations for CSV sources fail if using the 8.x-3.x branch of the Migrate Source CSV module. See this issue for more context.
- As of this writing, the user interface for renaming columns in CSV sources produces a fatal error if using the 8.x-3.x branch of the Migrate Source CSV module. See this issue for more context.
- As of this writing, it is not possible to execute all migrations in a group from the user interface in one operation. See this issue for more context.
- The Migrate source UI module can be used to upload a file to be used as source in CSV migrations. As of this writing, a similar feature for JSON and XML files is not working. See this issue for more context.
To reiterate, it is not recommended to use the user interface to add configuration related to migrations and execute them. The extra layer of abstractions can make it harder to debug problems with migrations if they arise. If possible, execute your migrations using the commands provided by Migrate Tools. Finally, it is recommended to read this article to learn more about the difference between managing migrations as code or configuration.
What did you learn in today’s blog post? Did you know you can import migration related configuration entities from the user interface? Did you know that Migrate Tools provides a user interface for running migrations? Share your answers in the comments. Also, I would be grateful if you shared this blog post with others.