
Defining Drupal migrations as configuration entities with the Migrate Plus module
Today, we are going to talk about how to manage migrations as configuration entities. This functionality is provided by the Migrate Plus module. First, we will explain the difference between managing migrations as code or configuration. Then, we will show how to convert existing migrations. Finally, we will talk about some important options to include in migration configuration entities. Let’s get started.
Drupal migrations: code or configuration?
So far, we have been managing migrations as code. This is functionality provided out of the box. You write the migration definition file in YAML format. Then, you place it in the `migrations` directory of your module. If you need to update the migration, you make the modifications to the files and then rebuild caches. More details on the workflow for migrations managed in code can be found in this article.
Migrate Plus offers an alternative to this approach. It allows you to manage migrations as configuration entities. You still use YAML files to write the migration definition files, but their location and workflow is different. They need to be placed in a `config/install` directory. If you need to update the migration, you make the modifications to the files and then sync the configuration again. More details on this workflow can be found in this article.
There is one thing worth emphasizing. When managing migrations as code you need access to the file system to update and deploy the changes to the file. This is usually done by developers. When managing migrations as configuration, you can make updates via the user interface as long as you have permissions to sync the site’s configuration. This is usually done by site administrators. You might still have to modify files depending on how you manage your configuration. But the point is that file system access to update migrations is optional. Although not recommended, you can write, modify, and execute the migrations entirely via the user interface.
Transitioning to configuration entities
To demonstrate how to transition from code to configuration entities, we are going to convert the JSON migration example. You can get the full code example at https://github.com/dinarcon/ud_migrations The module to enable is `UD config JSON source migration` whose machine name is `ud_migrations_config_json_source`. It comes with four migrations: `udm_config_json_source_paragraph`, `udm_config_json_source_image`, `udm_config_json_source_node_local`, and `udm_config_json_source_node_remote`.
The transition to configuration entities is a two step process. First, move the migration definition files from the `migrations` folder to a `config/install` folder. Second, rename the files so that they follow this pattern: `migrate_plus.migration.[migration_id].yml`. For example: `migrate_plus.migration.udm_config_json_source_node_local.yml`. And that’s it! Files placed in that directory following that pattern will be synced into Drupal’s active configuration when the module is installed for the first time (only). Note that changes to the files require a new synchronization operation for changes to take effect. Changing the files and rebuilding caches does not update the configuration as it was the case with migrations managed in code.
If you have the Migrate Plus module enabled, it will detect the migrations and you will be able to execute them. You can continue using the Drush commands provided the Migrate Run module. Alternatively, you can install the Migrate Tools module which provides Drush commands for running both types of migrations: code and configuration. Migrate Tools also offers a user interface for executing migrations. This user interface is only for migrations defined as configuration though. It is available at `/admin/structure/migrate`. For now, you can run the migrations using the following Drush command: `drush migrate:import udm_config_json_source_node_local –execute-dependencies`.
Note: For executing migrations in the command line, choose between Migrate Run or Migrate Tools. You pick one or the other, but not both as the commands provided by the two modules have the same name. Another thing to note is that the example uses Drush 9. There were major refactorings between versions 8 and 9 which included changes to the name of the commands.
UUIDs for migration configuration entities
When managing migrations as configuration, you can set extra options. Some are exposed by Migrate Plus while others come from Drupal’s configuration management system. Let’s see some examples.
The most important new option is defining a UUID for the migration definition file. This is optional, but adding one will greatly simplify the workflow to update migrations. The UUID is used to keep track of every piece of configuration in the system. When you add new configuration, Drupal will read the UUID value if provided and update that particular piece of configuration. Otherwise, it will create a UUID on the fly, attach it to the configuration definition, and then import it. That is why you want to set a UUID value manually. If changes need to be made, you want to update the same configuration, not create a new one. If no UUID was originally set, you can get the automatically created value by exporting the migration definition. The workflow for this is a bit complicated and error prone so always include a UUID with your migrations. This following snippet shows an example UUID:
uuid: b744190e-3a48-45c7-97a4-093099ba0547
id: udm_config_json_source_node_local
label: 'UD migrations configuration example'
The UUID a string of 32 hexadecimal digits displayed in 5 groups. Each is separated by hyphens following this pattern: 8-4-4-4-12. In Drupal, two or more pieces of configuration cannot share the same value. Drupal will check the UUID and the type of configuration in sync operations. In this case the type is signaled by the `migrate_plus.migration.` prefix in the name of the migration definition file.
When using configuration entities, a single migration is identified by two different options. The `uuid` is used by the Drupal’s configuration system and the `id` is used by the Migrate API. Always make sure that this combination is kept the same when updating the files and syncing the configuration. Otherwise you might get hard to debug errors. Also, make sure you are importing the proper configuration type. The latter should not be something to worry about unless you utilize the user interface to export or import single configuration items.
If you do not have a UUID in advance for your migration, you can try one of these commands to generate it:
# Use Drupal's UUID service.
$ drush php:eval "echo \Drupal::service('uuid')->generate() . PHP_EOL;"

# Use a Drush command provided by the Devel module, if enabled.
$ drush devel:uuid

# Use a tool provided by your operating system, if available.
$ uuidgen
Alternatively, you can search online for UUID v4 generators. There are many available.
Technical note: Drupal uses UUID v4 (RFC 4122 section 4.4) values which are generated by the `uuid` service. There is a separate class for validation purposes. Drupal might override the UUID service to use the most efficient generation method available. This could be using a PECL extension or a COM implementation for Windows.
Automatically deleting migration configuration entities
By default, configuration remains in the system even if the module that added it gets uninstalled. This can cause problems if your migration depends on custom migration plugins provided by your module. It is possible to enforce that migration entities get removed when your custom module is uninstalled. To do this, you leverage the `dependencies` option provided by Drupal’s configuration management system. The following snippet shows how to do it:
uuid: b744190e-3a48-45c7-97a4-093099ba0547
id: udm_config_json_source_node_local
label: 'UD migrations configuration example'
dependencies:
  enforced:
    module:
      - ud_migrations_config_json_source
You add the machine name of your module to `dependencies > enforced > module` array. This adds an enforced dependency on your own module. The effect is that the migration will be removed from Drupal’s active configuration when your custom module is uninstalled. Note that the top level `dependencies` array can have others keys in addition to `enforced`. For example: `config` and `module`. Learning more about them is left as an exercise for the curious reader.
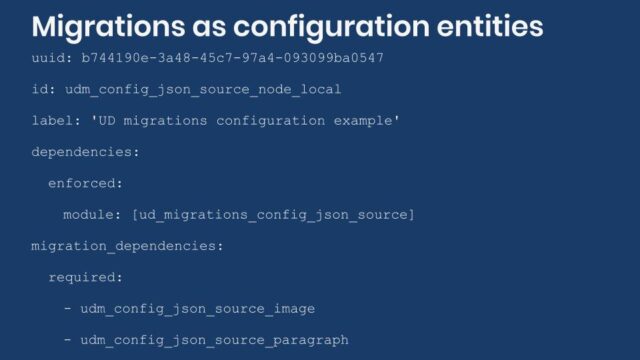
It is important not to confuse the `dependencies` and `migration_dependencies` options. The former is provided by Drupal’s configuration management system and was just explained. The latter is provided by the Migrate API and is used to declare migrations that need be imported in advance. Read this article to know more about this feature. The following snippet shows an example:
uuid: b744190e-3a48-45c7-97a4-093099ba0547
id: udm_config_json_source_node_local
label: 'UD migrations configuration example'
dependencies:
  enforced:
    module:
      - ud_migrations_config_json_source
migration_dependencies:
  required:
    - udm_config_json_source_image
    - udm_config_json_source_paragraph
  optional: []
What did you learn in today’s blog post? Did you know that you can manage migrations in two ways: code or configuration? Did you know that file name and location as well as workflows need to be adjusted depending on which approach you follow? Share your answers in the comments. Also, I would be grateful if you shared this blog post with others.