
Introduction to migration dependencies in Drupal
One of Drupal’s biggest strengths is its data modeling capabilities. You can break the information that you need to store into individual fields and group them in content types. You can also take advantage of default behavior provided by entities like nodes, users, taxonomy terms, files, etc. Once the data has been modeled and saved into the system, Drupal will keep track of the relationship between them. Today we will learn about migration dependencies in Drupal.
As we have seen throughout the series, the Migrate API can be used to write to different entities. One restriction though is that each migration definition can only target one type of entity at a time. Sometimes, a piece of content has references to other elements. For example, a node that includes entity reference fields to users, taxonomy terms, and images. The recommended way to get them into Drupal is writing one migration definition for each. Then, you specify the relationships that exist among them.
Breaking up migrations
When you break up your migration project into multiple, smaller migrations they are easier to manage and you have more control of process pipeline. Depending on how you write them, you can rest assured that imported data is properly deleted if you ever have to rollback the migration. You can also enforce that certain elements exist in the system before others that depend on them can be created. In today’s example, we are going to leverage the example from the previous post to demonstrate this. The portraits imported in the file migration will be used in the image field of nodes of type article.
You can get the full code example at https://github.com/dinarcon/ud_migrations The module to enable is `UD migration dependencies introduction` whose machine name is `ud_migrations_dependencies_intro`. Last time the `udm_dependencies_intro_image` was imported. This time `udm_dependencies_intro_node` will be executed. Notice that both migrations belong to the same module. Refer to this article to learn where the module should be placed.
Writing the source and destination definition
To keep things simple, the example will only write the node title and assign the image field. A constant will be provided to create the alternative text for the images. The following snippet shows how the source section is configured:
source:
  constants:
    PHOTO_DESCRIPTION_PREFIX: 'Photo of'
  plugin: embedded_data
  data_rows:
    - unique_id: 1
      name: 'Michele Metts'
      photo_file: 'P01'
    - unique_id: 2
      name: 'David Valdez'
      photo_file: 'P03'
    - unique_id: 3
      name: 'Clayton Dewey'
      photo_file: 'P04'
  ids:
    unique_id:
      type: integer
Remember that in this migration you want to use files that have already been imported. Therefore, no URLs to the image files are provided. Instead, you need a reference to the other migration. Particularly, you need a reference to the unique identifiers for each element of the file migration. In the process section, this value will be used to look up the portrait that will be assigned to the image field.
The destination section is quite short. You only specify that the target is a node entity and the content type is article. Remember that you need to use the machine name of the content type. If you need a refresher on how this is set up, have a look at the articles in the series. It is recommended to read them in order as some examples expand on topics that had been previously covered. The following snippet shows how the destination section is configured:
destination:
  plugin: 'entity:node'
  default_bundle: article
Using previously imported files in image fields
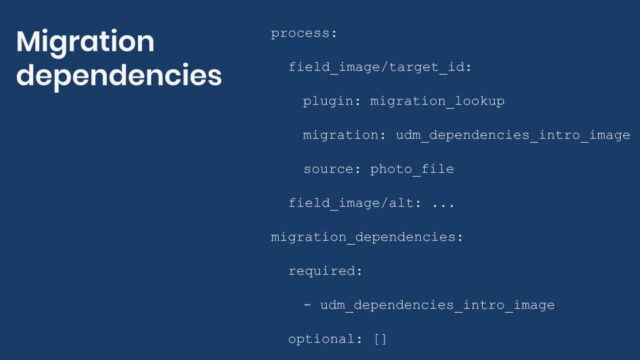
To be able to reuse the previously imported files, the `migrate_lookup` plugin is used. Additionally, an alternative text for the image is created using the `concat` plugin. The following snippet shows how the process section is configured:
process:
  title: name
  field_image/target_id:
    plugin: migration_lookup
    migration: udm_dependencies_intro_image
    source: photo_file
  field_image/alt:
    plugin: concat
    source:
      - constants/PHOTO_DESCRIPTION_PREFIX
      - name
    delimiter: ' '
In Drupal, files and images are entity reference fields. That means, they only store a pointer to the file, not the file itself. The pointer is an integer number representing the file ID (`fid`) inside Drupal. The `migration_lookup` plugin allows you to query the file migration so imported elements can be reused in node migration.
The `migration` option indicates which migration to query specifying its migration id. Additionally, you indicate which columns in your source match the unique identifiers of the migration to query. In this case, the values of the `photo_file` column in `udm_dependencies_intro_node` matches those of the `photo_id` column in `udm_dependencies_intro_image`. If a match is found, this plugin will return the file ID which can be directly assigned to the `target_id` of the image field. That is how the relationship between the two migrations is established.
Note: The `migration_lookup` plugin allows you to query more than one migration at a time. Refer to the documentation for details on how to set that up and why you would do it. It also offers additional configuration options.
As a good accessibility practice, an alternative text is set for the image using the `alt` subfield. Other than that, only the node title is set. And with that, you have two migrations connected between them. If you were to rollback both of them, no file or node would remain in the system.
Being explicit about migration dependencies
The node migration depends on the file migration. That it, it is required for the files to be migrated first before they can be used to as images for the nodes. In fact, in the provided example, if you were to import the nodes before the files, the migration would fail and no node would be created. You can be explicit about migration dependencies. To do it, add a new configuration option to the node migration that lists which migrations it depends on. The following snippet shows how this is configured:
migration_dependencies:
  required:
    - udm_dependencies_intro_image
  optional: []
The `migration_dependencies` key goes at the root level of the YAML definition file. It accepts two configuration options: `required` and `optional`. Both accept an array of migration ids. The `required` migrations are hard prerequisites. They need to be executed in advance or the system will refuse to import the current one. The `optional` migrations do not have to be executed in advance. But if you were to execute multiple migrations at a time, the system will run them in the order suggested by the dependency hierarchy. Learn more about migration dependencies in this article. Also, check this comment on Drupal.org in case you have problems where the system reports that certain dependencies are not met.
Now that the dependency among migrations has been explicitly established you have two options. Either import each migration manually in the expected order. Or, import the parent migration using the `–execute-dependencies` flag. When you do that, the system will take care of determining the order in which all migrations need to be imported. The following two snippets will produce the same result for the demo module:
$ drush migrate:import udm_dependencies_intro_image
$ drush migrate:import udm_dependencies_intro_node
$ drush migrate:import udm_dependencies_intro_node --execute-dependencies
In this example, there are only two migrations, but you can have as many as needed. For example, a node with references to users, taxonomy terms, paragraphs, etc. Also note that the parent entity does not have to be a node. Users, taxonomy terms, and paragraphs are all fieldable entities. They can contain references the same way nodes do. In future entries, we will talk again about migration dependencies and provide more examples.
Tagging migrations
The core Migrate API offers another mechanism to execute multiple migrations at a time. You can tag them. To do that you add a `migration_tags` key at the root level of the YML definition file. Its value an array of arbitrary tag names to assign to the migration. Once set, you run them using the migrate import command with the `–tag` flag. You can also rollback migrations per tag. The first snippet shows how to set the tags and the second how to execute them:
migration_tags:
  - UD Articles
  - UD Example
$ drush migrate:import --tag='UD Articles,UD Example'
$ drush migrate:rollback --tag='UD Articles,UD Example'
It is important to note that tags and dependencies are different concepts. They allow you to run multiple migrations at a time. It is possible that a migration definition file contains both, either, or neither. The tag system is used extensively in Drupal core for migrations related to upgrading to Drupal 8 from previous versions. For example, you might want to run all migrations tagged ‘Drupal 7’ if you are coming from that version. It is possible to specify more than one tag when running the migrate import command separating each with a comma (,).
Note: The Migrate Plus module offers migration groups to organize migrations similarly to how tags work. This will be covered in a future entry. Just keep in mind that tags are provided out of the box by the Migrate API. On the other hand, migrations groups depend on a contributed module.
What did you learn in today’s blog post? Have you used the `migration_lookup` plugin to query imported elements from a separate migration? Did you know you can set required and optional dependencies? Have you used tags to organize your migrations? Please share your answers in the comments. Also, I would be grateful if you shared this blog post with your colleagues.