
Migrating Google Sheets into Drupal
IMPORTANT: As of August 2, 2021, Google has turned down the Sheets v3 API. The new v4 API requires attaching an API key to the request URL which is a different process from the one explained in this article. Because of this, the example as it currently setup will no longer work. Notice the the Migrate Google Sheets module still can be used if a valid v4 API URL is used. See this issue regarding Sheets v4 compatibility.
Today we will learn how to migrate content from Google Sheets into Drupal using the Migrate Google Sheets module. We will give instructions on how to publish them in JSON format to be consumed by the migration. Then, we will talk about some assumptions made by the module to allow easier plugin configurations. Finally, we will present the source plugin configuration for Google Sheets migrations. Let’s get started.
Getting the code
You can get the full code example at https://github.com/dinarcon/ud_migrations The module to enable is `UD Google Sheets, Microsoft Excel, and LibreOffice Calc source migration` whose machine name is `ud_migrations_sheets_sources`. It comes with four migrations: `udm_google_sheets_source_node.yml`, `udm_libreoffice_calc_source_paragraph.yml`, `udm_microsoft_excel_source_image.yml`, and `udm_backup_csv_source_node.yml`. The last one is a backup in case the Google Sheet is not available. To execute it you would need the Migrate Source CSV module.
You can get the Migrate Google Sheets module and its dependency using composer: `composer require ‘drupal/migrate_google_sheets:^1.0’`. It depends on Migrate Plus. Installing via composer will get you both modules. If your Drupal site is not composer-based, you can download them manually.
Understanding the example set up
This migration will reuse the same configuration from the introduction to paragraph migrations example. Refer to that article for details on the configuration. The destinations will be the same content type, paragraph type, and fields. The source will be changed in today’s example, as we use it to explain Google Sheets migrations. The end result will again be nodes containing an image and a paragraph with information about someone’s favorite book. The major difference is that we are going to read from different sources. In the next article, two of the migrations will be explained. They read from Microsoft Excel and LibreOffice Calc files.
Note: You can literally swap migration sources without changing any other part of the migration. This is a powerful feature of ETL frameworks like Drupal’s Migrate API. Although possible, the example includes slight changes to demonstrate various plugin configuration options. Also, some machine names had to be changed to avoid conflicts with other examples in the demo repository.
Migrating nodes from Google Sheets
In any migration project, understanding the source is very important. For Google Sheets there are many details that need your attention. First, the module works on top of Migrate Plus and extends its JSON data parser. In fact, you have to publish your Google Sheet and consume it in JSON format. Second, you need to make the JSON export publicly available. Third, you must understand the JSON format provided by Google Sheets and the assumptions made by the module to configure your fields properly. Specific instructions for Google Sheets migrations will be provided. That being said, everything explained in the JSON migration example is applicable in this case too.
Publishing a Google Sheet in JSON format
Before starting the migration you need the source from where you will extract the data. For this, create a Google Sheet document. The example will use this one:
https://docs.google.com/spreadsheets/d/1YVJt9isPNjkUNHf3YgoTx38r04TwqRYnp1LFrik3TAk/edit#gid=0
The `1YVJt9isPNjkUNHf3YgoTx38r04TwqRYnp1LFrik3TAk` value is the worksheet ID which will be used later. Once you are done creating the document, you need to publish it so it can be consumed by the Migrate API. To do this, go to the `File` menu and then click on `Publish to the web`. A modal window will appear where you can configure the export. Note that it is possible to publish the `Entire document` or only some of the worksheets (tabs). The example document has two: `UD Example Sheet` and `Do not peek in here`. Make sure that all the worksheets that you need are published or export the entire document. Unless multiple `urls` are configured, a migration can only import from one worksheet at a time. If you fetch from multiple `urls` they need to have homogeneous structures. When you click the `Publish` button, a new URL will be presented. In the example it is:
The previous URL will not be used. Publishing a document is a required step, but the URL that you get should be ignored. Note that you do not have to share the document. It is fine that the document is private to you as long as it is published. It is up to you if you want to make it available to `Anyone with the link` or `Public on the web` and potentially grant edit or comment access. The `Share` setting does not affect the migration. The final step is getting the JSON representation of the document. You need to assemble a URL with the following pattern:
http://spreadsheets.google.com/feeds/list/[workbook-id]/[worksheet-index]/public/values?alt=json
Replace the `[workbook-id]` by worksheet ID mentioned at the beginning of this section. The one that is part of the regular document URL, not the published URL. The `worksheet-index` is an integer number starting that represents the order in which worksheets appear in the document. Use `1` for the first, `2` for the second, and so on. This means that changing the order of the worksheets will affect your migration. At the very least, you will have to update the path to reflect the new index. In the example migration, the `UD Example Sheet` worksheet will be used. It appears first in the document so worksheet index is `1`. Therefore, the exported JSON will be available at the following URL:
Understanding the published Google Sheet JSON export
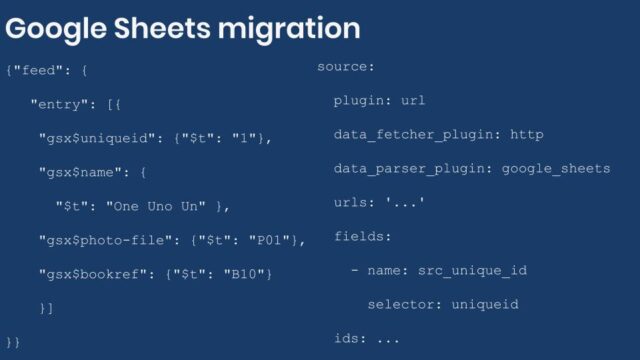
Take a moment to read the JSON export and try to understand its structure. It contains much more data than what you need. The records to be imported can be retrieved using this XPath expression: `/feed/entry`. You would normally have to assign this value to the `item_selector` configuration of the Migrate Plus’ JSON data parser. But, because the value is the same for all Google Sheets, the module takes care of this automatically. You do not have to set that configuration in the source section. As for the data cells, have a look at the following code snippet to see how they appear on the export:
{
  "feed": {
    "entry": [
      {
        "gsx$uniqueid": {
          "$t": "1"
        },
        "gsx$name": {
          "$t": "One Uno Un"
        },
        "gsx$photo-file": {
          "$t": "P01"
        },
        "gsx$bookref": {
          "$t": "B10"
        }
      }
    ]
  }
}
Tip: Firefox includes a built-in JSON document viewer which helps a lot in understanding the structure of the document. If your browser does not include a similar tool out of the box, look for one in their extensions repository. You can also use a file formatter to pretty print the JSON output.
The following is a list of headers as they appear in the Google Sheet compared to how they appear in the JSON export:
- `unique_id` appears like `gsx$uniqueid`.
- `name` appears like `gsx$name`.
- `photo-file` appears like `gsx$photo-file`.
- `Book Ref` appears like `gsx$bookref`.
So, the header name from Google Sheet gets transformed in the JSON export. They get a prefix of `gsx$` and the header name is transformed to all lowercase letters with spaces and most special characters removed. On top of this, the actual cell value, that you will eventually import, is in a `$t` property one level under the header name. Now, you should create a list of fields to migrate using XPath expressions as selectors. For example, for the `Book Ref` header, the selector would be `gsx$bookref/$t`. But that is not the way to configure the Google Sheets data parser. The module makes some assumptions to make the selector clearer. So, the `gsx$` prefix and `/$t` hierarchy are assumed. For the selector, you only need to use the transformed name. In this case: `uniqueid`, `name`, `photo-file`, and `bookref`.
Configuring the Migrate Google Sheets source plugin
With the JSON export of the Google Sheet and the list of transformed header names, you can proceed to configure the plugin. It will be very similar to configuring a remote JSON migration. The following code snippet shows source configuration for the node migration:
source:
  plugin: url
  data_fetcher_plugin: http
  data_parser_plugin: google_sheets
  urls: 'http://spreadsheets.google.com/feeds/list/1YVJt9isPNjkUNHf3YgoTx38r04TwqRYnp1LFrik3TAk/1/public/values?alt=json'
  fields:
    - name: src_unique_id
      label: 'Unique ID'
      selector: uniqueid
    - name: src_name
      label: 'Name'
      selector: name
    - name: src_photo_file
      label: 'Photo ID'
      selector: photo-file
    - name: src_book_ref
      label: 'Book paragraph ID'
      selector: bookref
  ids:
    src_unique_id:
      type: integer
You use the `url` plugin, the `http` fetcher, and the `google_sheets` parser. The latter is provided by the module. The `urls` configuration is set to the exported JSON link. The `item_selector` is not configured because the `/feed/entry` value is assumed. The fields are configured as in the JSON migration with the caveat of using the transformed header values for the `selector`. Finally, you need to set the `ids` key to a combination of fields that uniquely identify each record.
The rest of the migration is almost identical to the JSON example. Small changes were made to prevent machine name conflicts with other examples in the demo repository. For reference, the following snippet shows part of the process, destination, and dependencies section for the Google Sheets migration.
process:
  field_ud_image/target_id:
    plugin: migration_lookup
    migration: udm_microsoft_excel_source_image
    source: src_photo_file
destination:
  plugin: 'entity:node'
  default_bundle: ud_paragraphs
migration_dependencies:
  required:
    - udm_microsoft_excel_source_image
    - udm_libreoffice_calc_source_paragraph
  optional: []
Note that the node migration depends on an image and paragraph migration. They are already available in the example. One uses a Microsoft Excel file as the source while the other a LibreOffice Calc document. Both of these migrations will be explained in the next article. Refer to this entry to know how to run migrations that depend on others. For example, you can run: `drush migrate:import –tag=’UD Sheets Source’`.
What did you learn in today’s blog post? Have you migrated from Google Sheets before? If so, what challenges have you found? Did you know the procedure to export a sheet in JSON format? Did you know that the Migrate Google Sheets module is an extension of Migrate Plus? Share your answers in the comments. Also, I would be grateful if you shared this blog post with others.